Monday, November 4, 2013
SSDT Issue–Online Index Option Ignored
Due to an issue with SSDT “working as designed”, the ONLINE=ON option is ignored as any of the criteria for comparing indexes within SSDT. On the positive side, it means that any index created that way won’t have the option dropped. On the negative side, it means that any index that is changed or added will not have that option.
If this is an issue to you, comment and vote on the related Connect ticket. If we can garner enough votes and interest, perhaps MS will hear us and change their mind about whether or not the ONLINE=ON should be part of the release script.
In the meantime, if you absolutely need this functionality, generate scripts for your releases and ensure that all index creates/alters include the option you want.
Edit: There's been some discussion about this on the MSDN forums around this. Kevin Cunnane posted several responses pointing to a Codeplex example of how this might be possible by compiling a DLL and referencing that through the SQLPackage command line. I have not had a chance to try that out yet, but am including the forum and Codeplex links for those who want to investigate further.
Forum post
Codeplex example
Tuesday, October 22, 2013
SSDT: Adding Logins for “Execute As”
We recently encountered an issue requiring us to use “Execute As” syntax in some of our stored procedures. Of course, we have multiple environments which all have different permission definitions so this would cause a bit of an issue. In this case, the login itself is standard in all of our environments, but we don’t define those within the project for the most part.
First problem: Add a new user called “MyLogin” to the project.
Solution: This was easy enough, I just added a new user to the project. However, I then ran into an issue that the Login for “MyLogin” did not exist in our master.dacpac reference.
Second Problem: Create a SQL Login reference within the master dacpac file that could be seen by all of our projects.
Solution: This proved to be a bit trickier. The model.xml file inside the default master.dacpac files contains many system-level objects. We would need to find the appropriate XML syntax for a new SQL Login element, add it to the model.xml file, and then update the hash for the dacpac file.
Extract the Model.xml file from our master.dacpac file
This can be easily done by finding your master.dacpac file that you referenced in your project and either renaming it to a .zip file or using a tool such as 7-zip to right-click the file and open it. Extract its “model.xml” file to some working folder.
Add a new SQL Login element to the model.xml file
Now that there’s a copy of model.xml to edit, open it in your favorite XML or Text editor. I like Notepad++, but even plain Notepad will work. Navigate to the very bottom of the file. We want to add the new element just before the </Model> tag. (for ease of use, not a requirement) The example XML is below. Note the “GloballyScoped” annotation type. This treats the entity as something that is available outside of the current database.
<Element Type="SqlLogin" Name="[MyLogin]">
<Property Name="Password" Value="MyPassword" />
<Annotation Type="GloballyScoped" />
</Element>
dacchksum.exe /i:Master.dacpac /u /v
This will change the checksum of your master.dacpac file so it will now work as a database reference.
Add your user to the project
Now that there’s a Login for the user to reference, you can now add the user to the project. Right-click the project, select “Add”, and then choose the “User” option. You’ll have a new User created which you can easily set up to reference the new login in your master file.
Overall, not my favorite way to do these things, but if I know that a login will exist on the server I am more comfortable with adding a user to the project than I would be otherwise. You could still run into issues if this login doesn’t exist everywhere you want to use the project.
Final Thoughts
As Gert mentions, this trick is for adding any object to master. If you have a copy of sp_whoisactive or sp_blitz that you want to reference for some reason, you can add them to some one-off project, then copy that XML Element node into your master’s model.xml, regen the hash, and enjoy a new globally referenced object. It’s a useful trick, though one I hope not to have to use very often.
Monday, September 23, 2013
SSIS, MySQL, and invalid Dates–Take #2
A while back I posted an article on handling dates in select statements from MySQL. The idea was that I wanted a quick way to generate select statements for MySQL that would automatically set any invalid date to NULL. (an invalid date being one such as “0000-00-00” or “1973-02-00”) After some more trial and error, I realized that this script was incomplete. I’ve created an updated script that should better handle those edge cases.
The script is largely the same as the former, but I’ve added handling for invalid years or months or days. We don’t want to redirect the rows for further error handling. We want to treat the dates that won’t successfully import as NULL. This could be done several ways within SSIS, but handling the transform within the select statement reduces our need to write many transforms to handle each date time for each table. (I suspect that BIML could be my friend for this task, but I’m not quite ready to tackle this with BIML.)
SELECT CONCAT(CASE
WHEN ordinal_position = 1 THEN 'SELECT '
ELSE ', '
END
, CASE data_type WHEN 'date'
THEN CONCAT('CASE WHEN ', column_name, '= ''0000-00-00'' THEN NULL '
, 'WHEN ', column_name, ' LIKE ''%0000%'' THEN NULL '
, 'WHEN ', column_name, ' LIKE ''%-00%'' THEN NULL '
, 'else ', column_name, ' END as ', column_name)
WHEN 'timestamp'
THEN CONCAT('CASE WHEN ', column_name, '= ''0000-00-00'' THEN NULL '
, 'WHEN ', column_name, ' LIKE ''%0000%'' THEN NULL '
, 'WHEN ', column_name, ' LIKE ''%-00%'' THEN NULL '
, 'else ', column_name, ' END as ', column_name)
WHEN 'time'
THEN CONCAT('CAST(', column_name, ' AS CHAR(8) ) as ', column_name )
ELSE column_name
END
, CASE WHEN ordinal_position <> maxord THEN ''
ELSE CONCAT(' FROM MySchema.', c.table_name, ';')
END) AS Select_Column_Name
FROM information_schema.columns AS c
JOIN (SELECT table_name,
Max(ordinal_position) AS MaxOrd
FROM information_schema.columns
WHERE table_schema = 'MySchema'
GROUP BY table_name) AS t1
ON c.table_name = t1.table_name
WHERE table_schema = 'MySchema'
ORDER BY c.table_name, ordinal_position
LIMIT 0, 50000;
Tuesday, May 14, 2013
SSDT: Setting Different Permissions per Environment
Attribution - I'm borrowing heavily from Jamie Thomson's ( blog | twitter ) post
A strategy for managing security for different environments using the Database Development Tools in Visual Studio 2010
Jamie addressed this problem for the older DB Projects (Datadude, VSTSDB, DBPro, etc.). He came up with an excellent, if somewhat complex, solution to effectively handle pushing different permissions to different environments. This is my attempt to update this and distill it into a "how to" for SSDT and SQL Projects, but I freely admit that this is based on Jamie's excellent work.
In general, the steps we'll want to take are:
- Generate a set of SQL Logins that will be used on the server.
- These should be run on the servers or local box already - we will not use these within the SQL Project itself though you can if you wish.
- Generate the files for users/roles/permissions for each database project and environment.
- Add the files to your SSDT SQL Project
- Create and set a variable for your environments in your SSDT SQL Project.
- Adjust your Security Wrapper file to handle your environments.
- Adjust your post-deploy script to call the Security Wrapper.

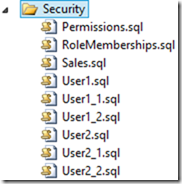
As you can see from the screenshot, we have a "Permissions" file containing granted permissions, a "RoleMemberships" file that adds users to various roles, a "Sales" file for the Sales schema, and 3 files each for the users - one for its schema, one for its login, and another for its user. Confusing, but not necessarily a problem until you need a release where User1 does not and will not exist on the server or where User2 belongs to a different domain than your production servers and can't and should not be created there because there's no trust relationship.
Let’s remove all of those files for objects other than Schemas from the project before we start. You’ll probably have to look at each file to verify before removing it from the project if you’re not sure which file is which. If you accidentally remove the files for the schemas, you’ll get errors and need to re-add a “Schema” to this security folder for each schema that is used.
Generate SQL Logins
This Microsoft KB article details the sp_help_revlogin stored procedure. Create this on your source database, run it, and use the output to re-create those logins elsewhere. This will copy all logins and users, but no permissions or database users.
Generate the Security Files through PowerShell
First, download the PowerShell_CreatePermissions.Zip file. Extract that to a folder on your hard drive.
Note - the script assumes that you will use Windows authentication to connect to your SQL Server. The script will need to be adjusted if you need to use SQL Authentication.
Edit the "GeneratePermissions.ps1" file. Replace the "DB1", "DB2", etc with whatever database names you'll be using. Also uncomment any of the extra lines that you'll need in the file. (There is likely a better way to do this in Powershell and I'm more than open to some suggestions on how to build up this array in a more concise manner.)
The assumption is made that the databasename == the projectname. If that's not the case, adjust your DB/Project names accordingly.
Open a PowerShell prompt in that folder after editing/saving the file.
Run the file using something like this commandline:
.\GeneratePermissions.ps1 -SQLInstance "localhost" -Environment DEV
"localhost" should be replaced with your servername
DEV in this case indicates that this will be tied to a variable value of "DEV" when the project is published.
I'd recommend running this for every environment at one time if you can. It will make adding the files to the project much easier.
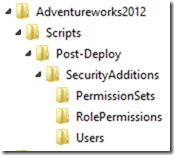
If you run for several environments, you'll see a folder structure something like the following for each project (in this case for Adventureworks2012):

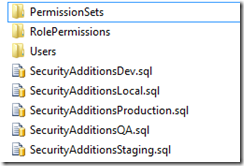
Inside your "SecurityAdditions" folder, you'll see the following files and folders:

Each of these files will be used to add permissions for each environment. In this case, we have permissions set for our Development, QA, Local, Production, and Staging environments.
Now, let's add the "SecurityAdditionsWrapper.sql" file from the files we extracted earlier into your "SecurityAdditions" folder. Feel free to edit it as needed to match the environment(s) you want to use for your database project. By default, it's set to look for the above files plus a "Default" file to be a catch-all. Adjust that so all files/environments match the files you created and save it.
Add the files to your SSDT SQL Project
Copy your newly created folder(s) to the appropriate project. Open each project, and you will notice that the files still don't show up. Click the project file. You should see a menu item that's now enabled to "show all files".

You'll see a bunch of files that aren't part of the project under a "Scripts" folder:

We want to add them to the project. Right-click the "Scripts" folder and select the option to "Include in Project". Click the Project file again and turn off the option to show all files.
- We need to set all file properties to "Not in Build" or there will be errors when trying to build the project.

Create and set your Variable to change environments
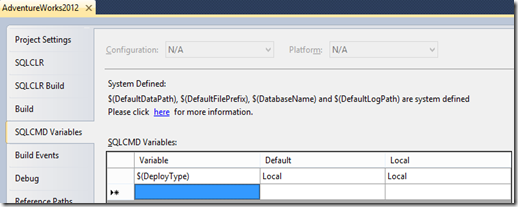
Open the Project Properties window

We want to change the SQLCMD variable to add a new variable called "DeployType". Set it's default value to "Local" for now, or whatever environment for which you have a set of security scripts.

Adjust your Security Wrapper files
The SecurityAdditionsWrapper.sql file in the code set I've created comes with settings for "Dev", "QA", "Staging", "Production", "Local", and "Default". It's likely that you will not use all of these in your setting. One drawback to using SQLCMD to wrap all these files together is that if you don't have a file or set of files, the script will start throwing errors because an expected file doesn't exist. Edit the SecurityAdditionsWrapper.sql file to remove any of the configurations you will not use or change the names to match the environment values you used earlier.
Adjust your Post-Deploy script
Finally, we need to open your Post-Deploy script.
Add the following to your script:
:r .\SecurityAdditions\SecurityAdditionsWrapper.SQL
This will include your SecurityAdditionsWrapper file as part of your post-deploy process. See my earlier post on selectively running pre/post deploy scripts if you want finer control.
SSDT: Trick to Not Run Pre/Post SQL on Publish
We’ve run across the need to avoid running certain scripts when publishing a brand new copy of a database from a SQL or DB Project from time to time. Often, those pre/post deploy scripts are designed to be run only against an existing system and don’t make sense for a brand-new, empty database.
We’ve worked around this by using a SQLCMD variable called DeployType and setting that variable to “New” for any build operation that will be used only to create the initial database. The code snippet for our Post-Deploy script looks something like the following:
-- Place scripts here if they should only run for existing/working DB
IF ( '$(DeployType)' <> 'New' )
BEGIN --Run scripts
PRINT 'Deploying scripts.'
END
--Security - runs last
:r .\SecurityAdditions\SecurityAdditionsWrapper.sql
The above script will look at the DeployType variable. If it’s set to “New”, it will ignore all of your deploy scripts in that block. If it’s set to any other environment, it will run the appropriate scripts if any exist. You can use this to control which environments will use certain scripts as well.
Wednesday, January 23, 2013
SSDT, Publishing, and Referenced Databases
In my haste to get the projects working, I added a database reference to the current project. I would build my project and reference the generated *.dacpac files when publishing. The problem is that every time I built my project, the referenced dacpac file would overwrite the generated dacpac file.
Results from this problem - I noticed that my "DeployType" variable wasn't referenced anywhere, which struck me as odd because I use it in my Pre and Post Deploy scripts. I also started noticing that my dacpac file in my build folder was out of date, even after a successful build.
Workaround - do what I have done otherwise - replace all instances of CurrentDatabaseName.dbo. with just dbo. in all SQL files in the project. This also includes the various forms that this can take:
Databasename.dbo.
Databasename..
[Databasename].[dbo].
etc
Once I replaced all of those references and rebuilt the project successfully, my publish actions started working again. My Deploy scripts were included. I didn't get mysterious warnings about my variables not existing.
There may be a different way to work around self-referenced database objects within SSDT, but until I come across that, the workaround is to remove them from the code and not to just add a reference to the current database through a dacpac file.